What platforms can scrapebox post to?
Scrapebox can post to the following platforms (In 1.x it requires the learning most poster be installed):
4images
CopperMine Photo Gallery
Gallery V2
Pixel Post
Plogger
Advanced Guestbook
AkoBook
ArdGuestbook
Basti2Web Guestbook
BeepWorld Guestbook
Bella Guestbook
Burning Book
Chinese Blog
CMS2Day
CoderWorld Guestbook
DEDE Ims
DRBGuestbook
Easybook
GA Guestbook
Icybook Guestbook
Jambook Guestbook
Jax Guestbook
Plesk Sitebuilder
Aska BBS
ASP Blog
Blog Engine
Joomla Comment
K2 Blog
Serendipity
TextCube Guestbook
Wordpress Blog
e107 Forum
WP Contact Form 7 (Scrapebox 2.0 only)
WP Secure Contact Form (Scrapebox 2.0 only)
Wordpress Trackbacks
Slow Poster Mode (obsolete - 1.x only):
Wordpress
Moveable Type
B2Evolution
BlogEngine
Drupal
Expression Engine
Note: You can train additional platforms, but it is and intermediate/advanced level task.
If you export failed entries from posting, then repost to the failed ones, why do more succeed the 2nd time around?
There are many reason for this behavior.
- The site could have been off line or overloaded the first time around
- The connection could have timed out
- The proxy used the first time could have been bad
All this could mean that a 2nd. run could post some additional comments. There are too many variables to try and control every time. Best practice to maximize a run, is to lower connection and increase timeouts. If you need maximum links from your runs, plan on reposing to the failed.
How do I specify the Anchor I want to use for my links?
Whatever you place in the names section is what will be used as your anchor.
How do you lock a specific anchor/name to a specific url?
You can lock a specific anchor to a specific url when posting. This allows you to post to many urls with different anchors in the same posting run. This feature is called Link Lock.
You use link lock in the websites.txt file. It should be formatted like this:
http://www.site.com {anchor1|anchor2|etc..}
http://www.site1.com {anchor1|anchor2|etc..}
You still are required place something in the names.txt file, as this is the backup file that will be used if something goes wrong. For instance if your spin syntax was messed up, scrapebox may not be able to understand what anchor you wanted, so it would use a line from the names file.
Scrapebox says X number were successful when posting, but the links aren't there
If you have ever commented on a blog manually then you might remember that sometimes you will get a notification from the blog saying that the comment was received. However many times you get no notification from the blog. When scrapebox receives that notification from the blog that the comment was received it reports it as successful. When it receives no notification it assumes that it failed. This does not mean that it did in fact fail, but scrapebox can not determine if it was successful or not. Many of the blogs that show failed in scrapebox, actually received your comment.
The blog commenter is just that, a commenter. It places the comments. Most comments will then go to moderation and be approved or denied. Some comments will be placed on auto approve blogs. Which is where the comment is automatically approved. So the successful post, just means the comment was submitted. It does not mean that the link is live on the site, that will be up to the admin to approve it or deny it. Unless it is auto approve, in which case it goes live immediately. If you check links right after you comment, those are going to be the ones that are auto approve.
What tokens can I use in the comments and messages file?
2.x Only:
- %currentdate% - Inserts today's date.
- %currenttime% - Inserts the current time.
- %currentos% - Inserts the Operating System that is being used.
- %newline% - Inserts a new line. This is handy if you want to have multiple paragraphs or just format your text as you wish.
- %domain% - Inserts the domain that the comment is being placed on. So like if you are commenting/sending a message on domain1.com then you can say like "I love %domain% !" - and it would show up as "I love domain1.com !"
1.x ONLY:
The below tokens specifically pertain to regular Fast and Slow poster in the main Scrapebox window. These tokens do not work with the learning mode addon. It has its own specific tokens. See the FAQ in the addons section here.
- %NAME% will be replaced with the users name from Names.txt
- %EMAIL% will be replaced with the users email from Emails.txt, hyperlinked (except BE, just the email)
- %WEBSITE% will be replaced with the users website from Websites.txt, hyperlinked (except BE, just the url)
- %BLOGURL% will be replaced with the blog’s url you are commenting on, hyperlinked (except BE, just the url)
- %BLOGTITLE% will be replaced with the page title of the blog you are commenting on
Note: the %BLOGURL% and %BLOGTITLE% tokens will not parse when using the test comments button. Meaning that when you click test comments and hit spin again and view your comments the first 3 tokens above will display what they are supposed to, but the blogurl and blogtitle will just display the token in the comment its self.
This is how it is supposed to be, because scrapebox does not know what blog it is posting to, so it can't render those. When the actual comment is submitted it will then parse those two tokens and submit the correct content in the comment.
Trackbacks Note: No tokens work with the trackback submitter.
Updated 3-16-2017
How does Fast Poster Connection Balancing work?
It splits your list in to 500 URL batches internally, the connections go down to zero momentarily after each 500 URL "burst' before the next 500 are posted to. This gives Windows and the network a short break to process outstanding messages etc and everything to free up.
It will slow down the comment run slightly, but can provide more stability on some peoples systems.
What determines the success rate when posting?
When you manually post to a blog, sometimes it will kick back and say something like "Your comment was successful". When scrapebox receives this message it reports the post as successful.
If scrapebox does not receive a message to this extent, it reports the post as failed. If you have done much manual blog commenting you know that that doesn't mean it failed. Sometimes it simply accepts your comment and redirects you back to the post without any notification, or something else. The comment might be successful in this case, but it just didn't kick back the notification so scrapebox can't report that it was successful, so it reports failed.
What is a Trackback?
In short a trackback is when site A links to site B and in turn site B links back to site A. (more or less). You do not have to link to the sites from your site for this to work, scrapebox sends trackbacks automatically and fakes it like you are linking to their site. So that they will link to your site without you having to link to theirs.
For a technical definition you can read more on trackbacks here.
Does scrapebox poster support nested spintax?
Yes the scrapebox commenter supports nested spintax. For example.
{{Hi|Hello} {how are you|how have you been}|{Hope you are well|Hope you have been well}}
Can I use spin text in emails for posting?
Yes you can use spin text in emails in the poster, such as fast poster in the bottom right hand quadrant of the main scrapebox window.
For Example:
Matt{1|2|3}@{hotmail|gmail|yahoo}.com
I whipped up a template for you to use as well. It uses a token, notice the %kw%. The concept here is that you go to the names tool and generate 100 names (or however many) and then paste them in the keyword box.
Important Note: Only use first names or last names NOT both, else there will be a space in between the first and last name, and clearly you can not put a space in an email address.
Then save off my email template below, into a text file. Then use the M merge button to merge it in and get endless variations. Then save those spun variations and use them for your emails.
The following should all be on one line. I also create the text file, so you can just download it here (right click and choose "save as").
%kw%{{1|2|3|4|5|6|7|8|9|0}|{1|2|3|4|5|6|7|8|9|0}{1|2|3|4|5|6|7|8|9|0}|{1|2|3|4|5|6|7|8|9|0}{1|2|3|4|5|6|7|8|9|0}{1|2|3|4|5|6|7|8|9|0}|{1|2|3|4|5|6|7|8|9|0}{1|2|3|4|5|6|7|8|9|0}{1|2|3|4|5|6|7|8|9|0}{1|2|3|4|5|6|7|8|9|0}}@{hotmail|gmail|
yahoo|googlemail|ymail|aol|mac|zoho|outlook|live|mail|inbox|facebookmail}.com
If you need further explanation on the Merge feature, you can get more info here:
Can scrapebox post to https urls?
Yes Scrapebox fully supports https.
When training the ScrapeBox Learning Mode Poster to new forms, what variables can be used?
Note: I have had success using GPTs like Chat GPT to help train platforms. You can feed it all of the below along with the form html and that can get you headed in the right direction.
Platform Guide
- Train new Platforms
- Enhance Existing Platforms
- Detect Different Captchas
- Modify Search Footprints
- Multi-step Forms
- Change Success/Fail Footprints
Also you can look here:
http://www.scrapebox.com/training-new-platforms
Since 2011 ScrapeBox has had the ability to learn new platforms, and ScrapeBox can post to virtually any platform or form that doesn’t require a user account to be created on the site website. So it can post to blog platforms, guestbooks, contact forms, trackbacks, some open forums and wiki’s.
In order to work with a platform, you will need to create a definition file which is just a plain text file using the Microsoft .ini format like the screenshot above. This consists of [Sections] which contain a number of Name=value keys. The first section in the ScrapeBox platform files is…
[SetUp]
The setup decides the basics on what footprints are used in the harvester to find the platform, how ScrapeBox can identify this platform once it loads a page, how can ScrapeBox detect if a comment to this platform was successful or failed and things like how to handle the URL’s and navigating the pages. Below are the available Name= entries that are valid for the setup.
FriendlyName= Any name you want to call the platform, will be used in the GUI.
UseBlackList= Values can be 1 to use a blacklist or 0 not not use the blacklist. This is the bad words list you can edit in the poster.
UseWhiteList= Values can be 1 to use a whitelist or 0 not not use the whitelist. This is the bad words list you can edit in the poster.
Platform= This is the type of platform it is, such as Blog, GuestBook, Image, Forum, Contact Form, Trackback and used used to group similar platforms.
Markup= How to handle links and code, values can be HTML or BB
PageMustContain= If any of the given strings can be found in the pagecode, the page is valid. | is interpreted as OR, * is interpreted as AND
Success= If any of the given strings can be found in the resultpage after post, the submission was a success. | is interpreted as OR, * is interpreted as AND
Failed= If any of the given string can be found in the resultpage after post, the submission failed. | is interpreted as OR, * is interpreted as AND
All platform definition files should have the above fields added and set, they are essentially the minimum “Required” fields to form the [Setup] for a platform platform file. The fields below are not required, but often must be used to perform more advanced functions in order to post to some platforms.
PageMustNotContain= If any of the given strings can be found in the pagecode, the page is invalid. | is interpreted as OR, * is interpreted as AND
Enctype= The Encoding type if you wish to override the forms default encoding such as application/x-www-form-urlencoded
LoadUrl= Locate the given url and load the target page. Will skip RemovefromUrl, RemoveFromUrlAfter, and ModifyUrl
LoadUrlFromAnchor= Locate the given anchor, grab the url and load the target page. Will skip RemovefromUrl, RemoveFromUrlAfter, and ModifyUrl
RemoveFromUrl= Remove given strings from the baseurl. Multiple strings are separated with |
RemoveFromUrlAfter= Remove everything from the position of given strings in the baseurl. Multiple strings are separated with |
ModifyUrl= Add something to the baseurl. variables %host% and %path% can be used to rebuild the baseurl.
DeleteCookies= List of cookie names to delete
Guestbook Example
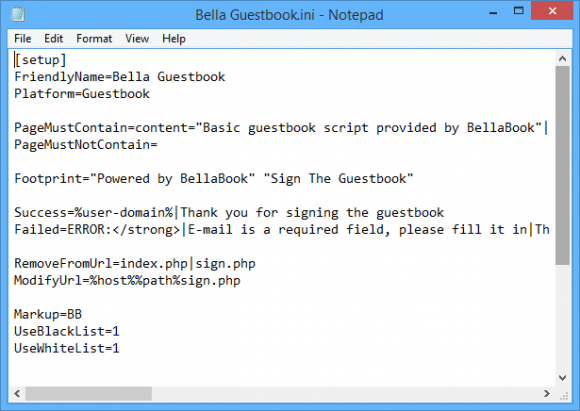
Here you can see a basic example of the [Setup] for Bella Guestbook.
For the PageMustContain, PageMustNotContain, Success and Failed values this scans the page contents for the markers you add so you can add text, html, javascript or anything in the page content.
This platform also uses 2 optional values RemoveFromUrl and ModifyUrl. This tells ScrapeBox when it lands on the guestbook, no matter what the page it should trim index.php and sign.php and everything after these like querystrings from the URL, then load %host%%path%sign.php so if it landed on scrapebox.com/guestbook/index.php?page=123 it would strip the last part and load scrapebox.com/guestbook/sign.php
This is used when the page you need to post the comment on is different then the page you load. So you can train ScrapeBox to navigate to the correct page to make the post.
[Step]
Once the [Setup] has been created, next is the [Step] which deals with making the post. The following are the available options and variables for the Step sections.
DoStepIf= Process this step only when any of the given strings can be found in the page code. | is interpreted as OR, * is interpreted as AND. If not set, the step will be processed always.
FormMustContain= The form is valid when any of the given strings can be found in the form. | is interpreted as OR, * is interpreted as AND
FormMustNotContain= If the form contains any of the given strings, the form is invalid. | is interpreted as OR, * is interpreted as AND
PostUrl= A | separated list of url parts used to grab the post url. It looks between <form and >
AddToPostUrl= A value added to post url. Masks (%…%) can be used.
DelayPost= Delay post by the given number of seconds. The variable %rndnum-x-y% can be use too.
DelayPostIf= Only delay the post when any of the listed strings can be found. Multiple strings are separated with |
AddToPostDataIfInpage= Will add all AddToPostData= fields when any of the with | separated strings is found in the pagecode.
AddToPostData= fieldname=variable will be added to the postdata when the AddToPostdataIfInPage condition is true. When no AddToPostDataIfInpage if set, AddToPostData will be added always.
EncodeFieldNames= 1 will url encode fieldnames.
Fieldnames can contain * as a wildcard. So if fieldname is captcha_code123 where 123 is different on each blog/post then captcha_code*=%captcha% will match.
Variables:
All ini setting using variables allow spintax, for example thename={%rnd-name%|%rnd-email%} is valid. Values assigned to variables also allow spintax.
%host% Represents the host name of the target url
%path% Represents the path of the target url
%rnd-name% Returns a random name from the file ~cpn.txt. Spintax allowed.
%rnd-email% Returns a random email from the file ~cpe.txt Spintax allowed.
%rnd-website% Returns a random website from the file ~cpw.txt Spintax allowed.
%rnd-comment% Returns a random comment from the file ~cpc.txt Spintax allowed.
%rnd-option% Return a random option. Values are grabbed from the <select/option tags of the form
%rnd-location% Spintax allowed.
%rndnum-x-y% Returns a random number between x and y.
%ignore% Just use the original value represented in the form.
%user-domain% Extract the domain of the user’s website generated previously by %rnd-website%
%user-name% Previously by %rnd-name% generated username
%user-email% Previously by %rnd-email% generated email
%user-comment% Previously by %rnd-comment% generated comment
%user-location% Previously by %rnd-location% generated location
%user-website% Previously by %rnd-website% generated website
%wphashcash% Result of WPHashCash processing (internal code)
%captcha% Image captcha result
%question% text captcha result
%serverstatus-200% Represents server status code 200
%serverstatus-302% Represents server status code 302
%header-xxxx% Checking the post header for the presence of xxxx in it.
%unixtimestamp% returns the current unix timestamp
%unixtimestampms% returns the current unix timestamp in milli seconds
%xxxxxx% Executing a section with the name xxxxx
You can have multiple [Step] configured for multi-step forms that may require you to fill out info on 2 or more pages.
Sections
[xxxxx]
Action=extract (extract a text between before and after)
Before= The text before the wanted part
After= The text after the wanted part
Default= If no part can be extracted, this is what will be used by default
[xxxxx]
Action=getfieldvalue (return the value of a field)
Fieldname=The name of the field
Other
processwpspamfree=1 use this to force the check for Wp-SpamFree
Failed MASK = Matches a Failed= ini response.
Note: The xxxxxx between the brackets can be anything you want.
Once you have a section setup, you use it in the [Step] section with the:
%xxxxxx% Executing a section with the name xxxxx
~~
For example if you wanted to include the following hidden field
<input type='hidden' name='contact-form-hash-value' value='df6619356840577fbc7abc197f3a23509eeeeb72' />
Then you would do like so
[hidden-field-1]
Action=extract
Before=name='contact-form-hash-value' value='
After='
Default=
Then in the [step] section you would put
contact-form-hash-value=%hidden-field-1%
Name Field
When training form fields your looking for the name=X field.
So for this sample form from the Icybook platform, some of the form code looks like
]
  <th class="newleft">*Name:</th>
      <td class="newright"><input type="text" size="30" name="autor" maxlength="30" value="" /></td>
    </tr>
    <tr>
      <th class="newleft">Email:</th>
      <td class="newright"><input type="text" size="30" name="email" maxlength="50" value="" /></td>
    </tr>
    <tr>
      <th class="newleft">Homepage:</th>
      <td class="newright"><input type="text" size="30" name="homepage" maxlength="50" value="http://" /></td>
    </tr>
So name="autor" is associated with the actual "Name" field where you put your name, so it would look like
autor=%rnd-name%
The above will look for the form field, which is on the left and populate that form field with what is on the right. In this case it will get a random name from your names.txt file (which is the topmost of the 5 boxes that you load in in Scrapebox when posting).
Then for the email, which is the next box down that you load in, it would be
email=%rnd-email%
And for your website link, from websites.txt box
homepage=%rnd-website%
So under the [Step] section you would have
autor=%rnd-name%
email=%rnd-email%
homepage=%rnd-website%
The fields on the left of the equals sign are the X in "name=X" of the form data and the variables (With percent signs) on the right hand side of the equals sign pull data from the files you load into Scrapebox.
Checkboxes
If you want to enable a checkbox it works off a system of zeros and ones. So a checkbox is either a 0 or a 1 like all the other ini settings. For example in the wordpress definition you can see
gasp_checkbox=1
0 is unchecked and 1 is checked.
The format is
Field name=value
Where field name is the name of the checkbox, as discussed in the section above this one and value is either 0 or 1. Again 0 is unchecked and 1 is checked.
Captchas
Captcha data is stored in the captcha.def and textcaptcha.def files.
So if you use %captcha% then scrapebox will look in captcha.def for the before and after markers to get the image to send to the captcha solving service/program.
Same goes for if you use %question% it will look for the markers in the textcaptcha.def files.
In textcaptcha.def:
The type=static is to extract a word from the contact form like "Please enter the word RED" and insert in to the post data. And type=variable is for a math question like 1+2=
captcha.def:
The name that you see above each element does not matter, it does not correspond to anything. Its just a friendly name to help you keep track of what is used for what. Also the number next to it is just so each has a unique name.
Multiple Steps
You can use multiple steps, like you see in the IcyBook Guestbook, Jambook Guestbook etc... definition files. You can also use the DoStepIf= parameter. However each step simply need
[STEP]
Then
[STEP1]
Then
[STEP2]
And so on.
Debugging
The simple truth is there can be things that happen behind the scenes that aren't always apparent. A invaluable tool that I have found for debugging is Http Debugger Pro
At the time of this writing there is a free trial and they have always had a free trial for years and years. So you can try it out and if you are doing one form it can help. If you are planning to train a lot of forms/platforms then its probably a good investment if it makes sense after using the trial.
I find it helpful run debugger and submit a form in a browser and look at the POST data and then you can know what the end server is expecting and make sure your ini will post the same data to the server.
Please note I am no way affiliate with http debugger pro. It has just saved me hours of time and made things possible I would not have otherwise been able to do.
Contact Form Poster Says Failed
Quite often the contact form poster will failed, but it was actually successful.
Scrapebox looks at the response content when posting and its looking for specific markers to find out if a post is successful or not.
If you are working with a site that has modified the default "thanks for posting" message then scrapebox won't be able to match the success message with one in its list. So if Scrapebox does not know 100% certain that the post succeeded it assumes it failed.
So you simply need to train scrapebox on what is a successful message for the sites/languages you are working with.
You first need to find the definition file. So if you look when posting, in the platforms column it will tell you the name. So for example assume its WP Contact, which is a common one.
Then you go into your
Scrapebox folder Configuration Platforms folder
Find the WPContact.ini file and edit it in notepad or similar.
Your looking for the
Success=
line.
You will see several entries there, each separated by the pipe key, which looks like |
So just add on your responses and separate them by pipe keys like it is there already.
Below you can find some additional possible success responses that you may want to add to your definition file. Please note that proceeding and trailing html markers are not "required", just the success text is enough. However if you do not include html markers then you may get false positives.
wpcf7-mail-sent-ok" role="alert">Thank you for your message. It has been sent.</div>
and also another one:
class="screen-reader-response" role="alert">Your message was sent successfully. Thanks.
etc..
~~~~~~~~~~~~~~~~~~~~~~~~~~~~~~~~~~~~~~~
Free 2x INI File
Alternatively below you can find a file that will 2x the success rate of the contact form poster. This is a free service as I do not work for Scrapebox. However there is a paid 15x version of the ini further below.
2x INI file that will double or more then double the success rate
To use the above files, first close down Scrapebox. Then go into your
Scrapebox Folder Configuration Folder
In that folder you will find a folder called Platforms. Make a complete backup of the Platforms folder in case something goes wrong, especially if you have modified files in that folder. Simply copy the entire folder to somewhere else on your hard drive.
Then unzip the files included in my downloadable file above, unzip them to the Platforms folder that is in your scrapebox folder. It will ask you if you want to overwrite, choose yes. (This assumes you are using Windows, for Mac you can use Finder to search for the files and then replace them that way).
Once the files are replaced, your set. Restart scrapebox and try it.
~~~~~~~~~~~~~~~~~~~~~~~~~~~~~~~~~~~~~~~
Paid 15X Success Improvement on top of the above free ini file
I have a INI file that is highly optimized and on average provides a 15X or higher success rate.
That translates to roughly 50% or higher success rates on lists scraped using the built in scrapebox footprint. (Means if you load your keywords and select the contact form 7 footprint from the platforms box in scrapebox and then scrape google. Then post, you would typically see a less then 1% success rate and with this ini you will see a more then 50% success rate on average.
What you get:
- 15x ini file
- Video detailing how to use the 15x ini file
- Some Other helpful basic resources
You can purchase this package here
~~
Lastly there is also a full course on contact form marketing as well, please contact me for details on this.